Quick start
In this section we will explain how, after successfully installing O&O DiskImage, you can take images of drives or your entire computer and restore them back to your computer.
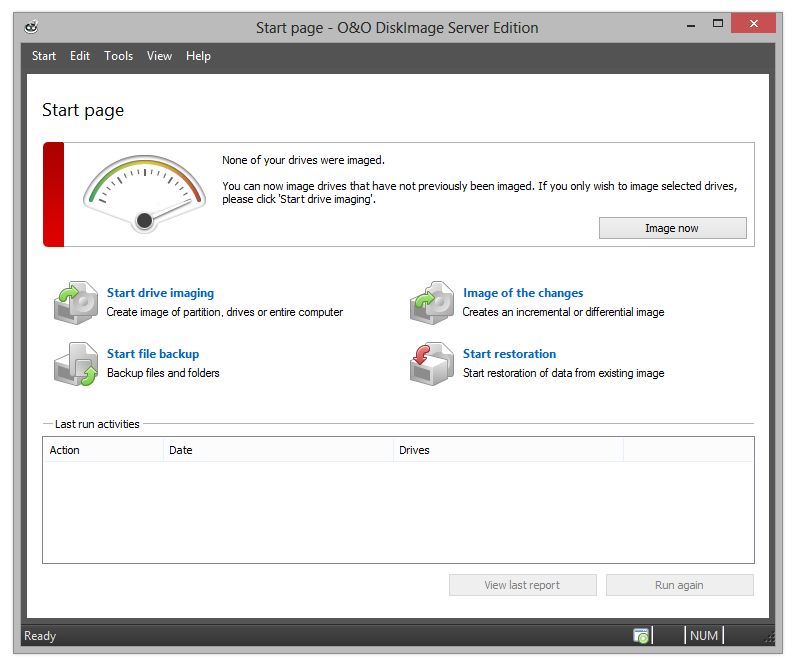
1 - Menu bar
2 - Activity window
3 -Last run activities
Start O&O DiskImage
- Start O&O DiskImage vie the Desktop shortcut or via the Windows menu Start/All Programs/O&O Software/O&O DiskImage/O&O DiskImage.
- For the simplified view select O&O DiskImage Express(Express View).
- O&O DiskImage Tray starts the TrayIcon, which is shown in the info area in the task bar and informs you on the activity status of O&O DiskImage.
You can access the program help by clicking on Help in the menu bar in the tab Help or by pushing F1.
Create images
Creating images on a regular basis is your only protection against data loss. Working daily on your computer causes it to collect ever larger amounts of data. If your last image was created some time ago, it does not include your most current files.
In the O&O DiskImage control center (start page), you get an overview of drives that have either not been imaged or whose image is considerably old. The color on display reflects the lapse of time since the last image was created.
0 - 10 Days = Green
10 - 20 Days = GreenYellow
20 - 30 Days = Yellow
Over 30 Days = Orange
Never been imaged = Red
We strongly advise you to prevent data loss and protect yourself with just a few clicks:
1. Click Image now.
2. Then check the target path entered for the image. We recommend saving the image on an external drive, e.g. USB hard drive.
3. Click Start to continue with the imaging process. The process might take some time depending on the size of the drive.
An image of all the listed drives will be created using default settings (Image of used sectors).
You can create a job for automatically imaging your drives on a regular basis. See chapter Scheduled functions.
If you want to create an image of your entire computer, you can also use One-click imaging.
Image the entire computer
One-click imaging is the fastest and easiest way to create a complete image of all your data and settings. One-click imaging is especially useful if you are using O&O DiskImage for the first time, or have not yet created an image of your computer. Your entire computer including the system partition can be imaged with just one click. The compression method (LZNT1) and the imaging method (imaging used sectors) are set as default.
We recommend using an external storage medium, e.g. a USB hard disk or a network drive, as target folder for One-click imaging.
- Start O&O DiskImage and select Drive imaging on the Start page.
- Now click the symbol Create one-click image in the activity bar.
- Check to make sure the target path is set to your desired storage location. The [...] button allows you to navigate to any folder.
- The image is automatically named after the creation date. You can however enter a name manually.
- Click Start to begin the imaging process. The imaging process can take some time depending on the size of the hard disk(s).
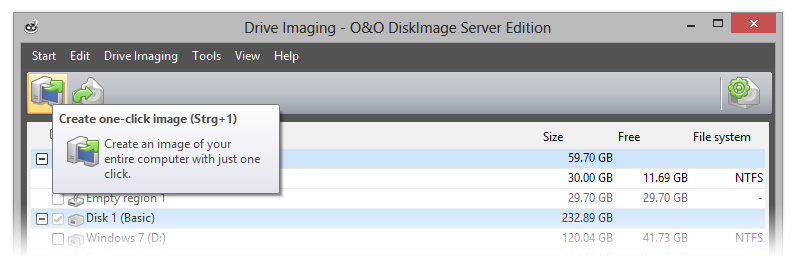
Image individual drives
O&O DiskImage will let you image individual drives (partitions/volumes). This enables you to image system and data drives separately from each other. In case of data loss, it then only becomes necessary to restore the data drive. You don't need to restore your entire computer.
To create an image of one or more drives, please follow the instructions below:
- In the start page select Drive imaging.
- Select one or more drives from the drive list. Enable the check next to the drive you want to select.
- Optionally, you can specify further settings under Imaging options or add the selected activity as Job.
- To start the imaging process click on Start drive imaging.
- Enter the target path of the drive on which you want to save the image. You can either accept the suggested default path or select another location. Under Program settings, you can also select individual default paths.
- The image is automatically named after the date of creation. You can, however, enter a name manually. All information from the image will be saved and can later be accessed through Image Information.
- Select Start. The image file will now be created.
If there is not enough space to store the entire image, you will be prompted to enter a new target path during the imaging process.
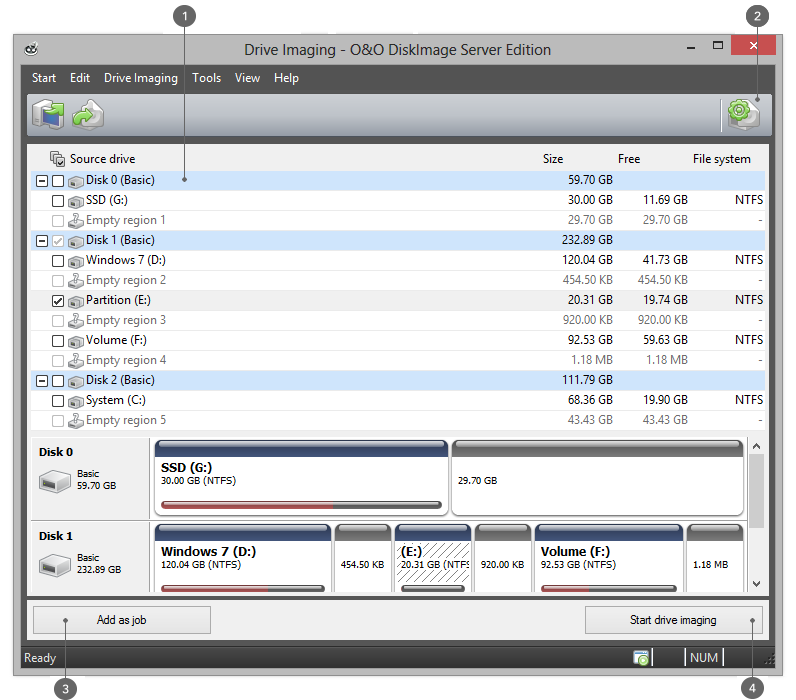
1 -Drive list: Source drive
2 - Add a job
3 - Start imaging
DiskView
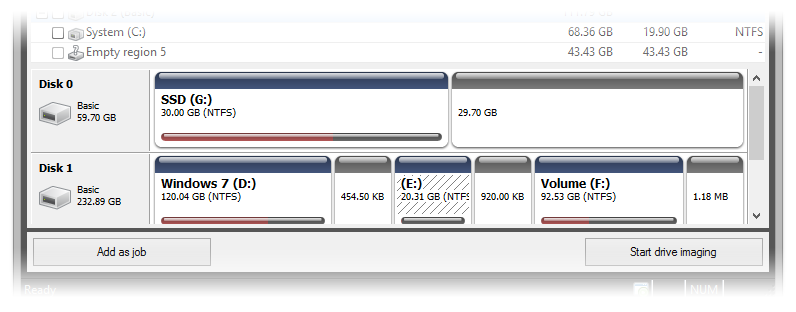
The interactive graphical display gives you an overview of all the hard disks. You'll be able to see both free and used space, as well as the size of the partitions.
You can select a drive for imaging by double-clicking it.
Among other things, the DiskView of O&O DiskImage displays all empty sectors. These empty areas occur due to the alignment of the partitions or volumes.
Back up individual files and folders
Do you want to backup individual folders or files instead of an entire drive? You can now do so with a file backup. Files are backed up directly during file backup. Compared to imaging a drive, file backup only includes the file information. No drive information is saved.
- On the start page of O&O DiskImage click File backup.
- Navigate to the folder you want to backup.
- Check the box next to those folders you want to backup. Multiple selections are also possible. You can also select an entire drive. All files located on the drive will be imaged.
- Then click the symbol Start file backup.
- If you don't want to use the default target path shown in the following dialog, please enter a new target.
- Click Start to continue with the file backup.
- A compressed file will then be created with the file extension OBK (*.obk).
Selection criteria
Before starting file backup, there's an option for selecting files or file types in the folder that you want to have included or excluded from the backup.
In the dialog, click Criteria and specify the settings you want.
You can specify further settings by clicking the icon File backup options. If you want to repeat the file backup at a later time, you can create a job for it. To do this, click the icon Add as job.
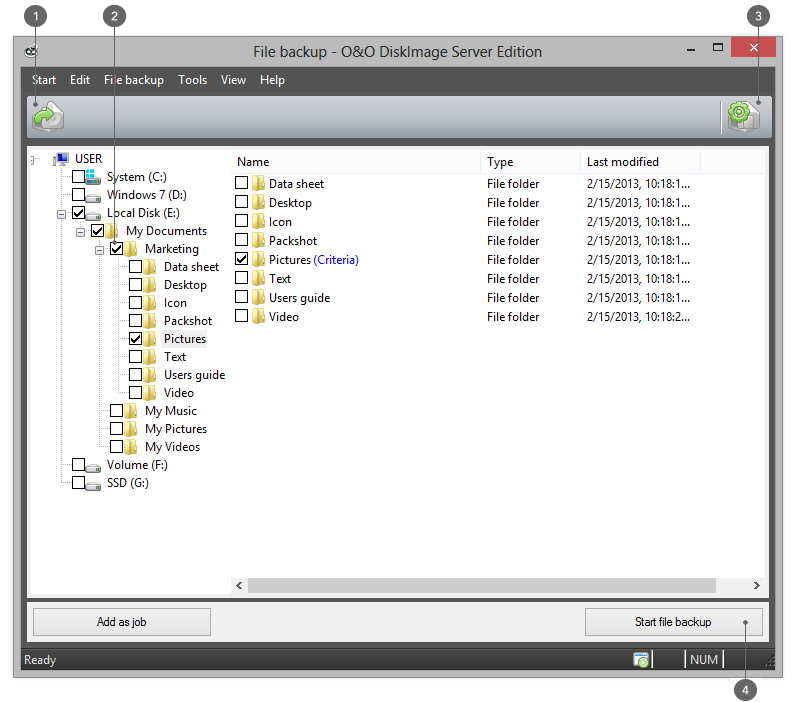
1 - Add job
2 - Folder view: Source drive
3 - File backup options
4 - Start file backup
Restore the entire computer
In order to restore your entire computer or system partition, you need to start O&O DiskImage from a bootable medium under Windows PE. Please proceed as described in chapter Start directly from bootable disk .
For the restoration of an image onto a computer with hardware different than the source computer, please consult the notes in chapter Machine independent restoration (M.I.R.).
- Start O&O DiskImage directly from the bootable medium.
- Select Drive restoration in the start page of O&O DiskImage.
- Click Select image in the form field or navigate to the storage location of the image in the browser button.
- Select the image containing the system partition i.e. all drives of your computer and click Open.
- All drives included in the image will be shown in the drive list.
- Check the drives you want to restore from the image. If you want to restore your entire computer, check all drives.
- Then select the target drive or disk that should be overwritten with data from the image.*
- Click the Start drive restoration symbol to start the restoration process.
- After restoration is successful, you can restart your computer.
*Note: Keep in mind when selecting the target drive that in Windows PE as of Windows Vista, drive letters are different: Drive C: (normaly containing the non-active operating system) will be assigned another letter (for example D).
Restore drives
To restore one or more drives from an image, proceed as follows:
- If you want to restore one or more drives from an existing image, click Drive restoration on the O&O DiskImage start page.
- Select the image you want to restore in the DropDown list of Select image. If the proposed images (*.obk) are not the ones you want to restore, check your drives and enter the path to the image file.
- Select the image file (*.omg or *.vhd) from the browser and click on Open.
- All drives contained in the image will then be displayed.
- Click the drive that you want to restore ("play back").
- Then, select the target drive for restoration by checking the box next to it. You can either replace an existing drive or create a new one: for example, in an empty sector.
- Optionally, you can specify further settings for the restoration under Restoration options.
- Whenever you have specified all settings, click on Start drive restoration to start the restoration.
During restoration, the image overwrites your selected drive with the data of the drive contained within the image. All data saved on the target drive is thereby lost and replaced by that of the image.
If your image is split among various disks, all these disks will be required for a restoration. If you have created an incremental image, all images - from the last complete image to the last incremental image - will be needed.
If you have a imaged an entire hard disk and the restoration is run on a different hard disks, then the new hard disk must possess at least as much space capacity as the source hard disk.
If you want to restore an entire system or system partition, you'll need to start your computer with the O&O DiskImage bootable medium and perform the restoration from there, seeStart directly from the bootable disk. If you should run a restoration of the system partition to different hardware, read chapter: Restoration on different hardware.
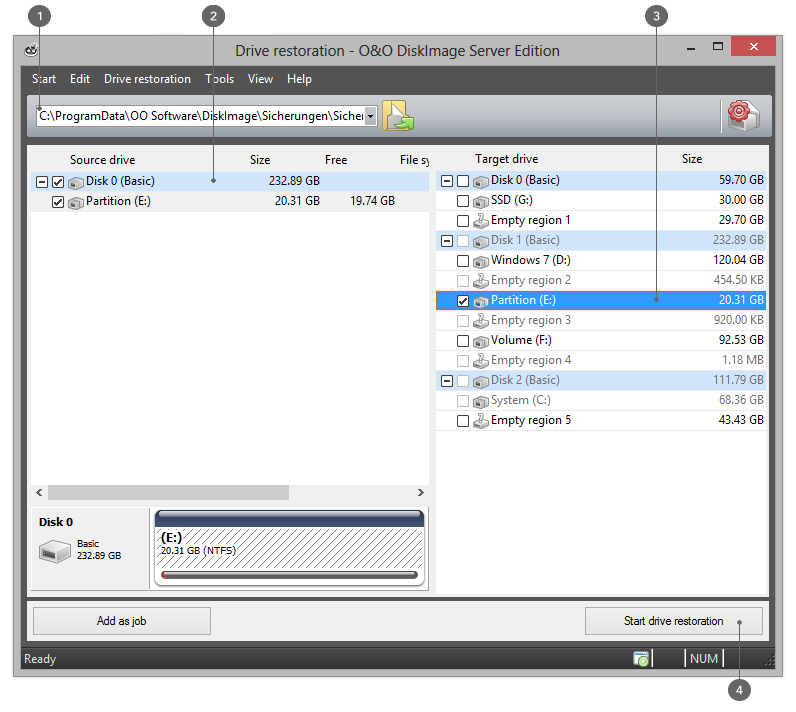
1 - Select image
2 - Select drive for restoration
3 - Enable target drive
4 - Start restoration
Restore individual files and folders
If you want to restore files or folders from already existing images, proceed as follows. The first thing to do is make sure you are able to access the image (*.obk).
- In the Quick Access bar click File restoration.
- Select the image you want to restore in the DropDown list of Select image. If the proposed images (*.obk) are not the ones you want to restore, check your drives and enter the path to the image file.
- Now click the symbol Select target folder.
- You can now restore data from the image in a new folder, or replace current data with that from the image.
- Once you've done that, start restoration.
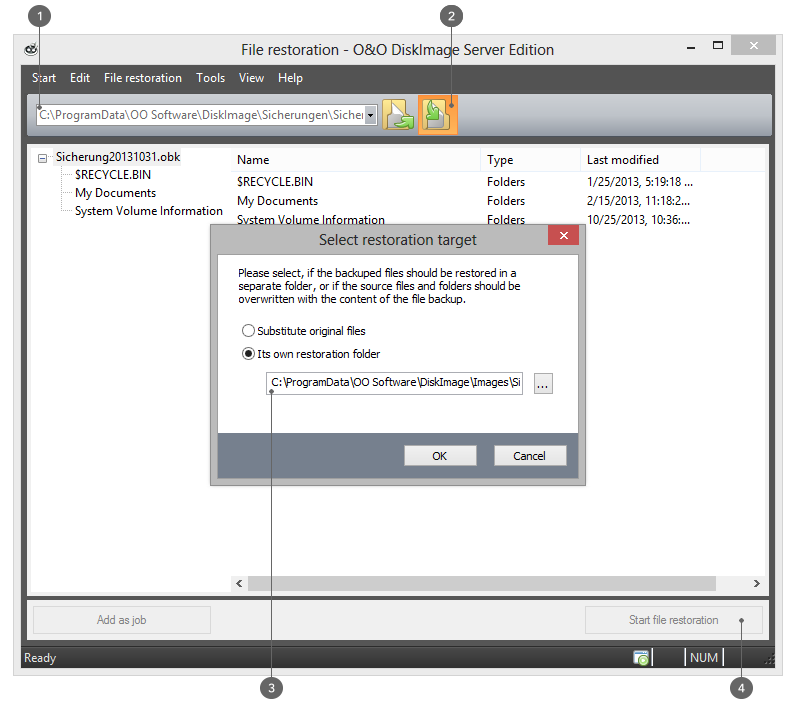
File restorartion
1 - Select image
2 - Show restoration target
3 - Select restoration target
4 - Start restoration
Image the changes only
If you only want to store the changes since the last image, you can create an Image of the change.
To create an image of the changes, you need to have created at least one complete image of the drives or folders involved.
Differential/incremental imaging
As a base image you can use either the complete image created using the “Used sector imaging”, “Forensic imaging” or “Direct forensic imaging”, or by using a previously created incremental image/differential image.
Follow the instructions below:
- Please make sure that the drive containing the base image is connected to your computer.
- Start O&O DiskImage and select Drive imaging on the start page.
- Enable the check for Incremental imaging.
- Select your base image in the browser window and click Open.
- Now click Apply (if you want to specify further settings) or on OK to proceed with the imaging.
- Click Start drive imaging.
- Now you can either select the recommended target folder for saving the image, or enter a new target path. For the sake of clarity, we recommend saving the base image and any subsequent images in one folder. The image is automatically named after the creation date. You can however enter a name manually.
- Click Start, to initiate the imaging process.
When creating an image of the changes, O&O DiskImage compares each sector of the existing image with the corresponding sector of the (source) disk being imaged. This might require more time than a complete image. The image of the changes, however, takes up much less space than a complete image.
The option Compare data with checksums is set by default. The last incremental image is all you'll need as a base image for creating a new incremental image.<![CDATA[ If ]]>Use checksums to administer unchanged data is not set, you will need the last base image and all the incremental images previously created, because all of them must be accessed for creating the new image.
Backup changes in a file
A complete image or a previously created image of the changes can be used as base image.
Follow the instructions below:
- Please make sure that the drive containing the base image is connected to your computer.
- Start O&O DiskImage and select File backup on the start page.
- Enable the check for Incremental File backup.
- Select your base image in the browser window and click Open.
- Now click Apply (if you want to specify further settings) or OK to proceed with the imaging.
- Click Start file backup.
- Now you can either select the recommended target folder for saving the image or enter a new target path. For the sake of clarity, we recommend saving the base image and its subsequent images in one folder. The image is automatically named after the creation date. You can however enter a name manually.
- Click Start, to initiate the imaging process.
Clone drives
Entire storage volumes or individual drives can be cloned, which in turn can be used instead of the originals. This function allows you to clone a drive and all its saved data without creating image files. The source disks/drives will be reproduced without any changes.
Please keep in mind that a clone requires much more free space than an image.
Unlike images, there are no incremental or differential clones possible for reducing the data volume of successive "Clone drives"clones. In addition, a clone cannot be compressed or encrypted compared to an image.
- Select Clone drive in the Quickaccess bar.
- Select the drive which you want to clone by enabling the check next to each drive or the entire disk.
- You can set additional settings for cloning under Cloning options.
- You can then specify the target drive. Simply enable the check next to the drive or the disk.
- In the following dialog under Advanced, you can specify whether certain functions should be executed when cloning is completed. These functions are disabled by default.
- Once you've enabled all your settings, click Start cloning, to begin the cloning process.
- You can also “recopy” your clone in exactly the same fashion - to put it back on your computer/drive.
When cloning your drive (source drive), the selected target drive, will be overwritten. All data stored on it will be deleted and replaced by the clone! You should therefore save the clone on something like an external hard disk chosen for this purpose.
When cloning a drive, you should adjust the properties of the target drive for future application. Make sure, for example, that the system partitions of the clone will also be able to boot.
If you're using a second hard disk as a target, O&O DiskImage will change its signature. This will guarantee that there are no two hard disks with the same signature connected to your computer. There might otherwise be complications during cloning or even a possible system crash. With simple hard disk structures (basic disk), all partitions in the operating system will be recognized by a link from hard disk signature and partition offset. During cloning, the registry entries of the drive letters, including the letters, will be adapted to the target system.
If you want to restore the clone of a system partition onto a PC with different hardware, please bear in mind the notes in chapter Restoring on different hardware (M.I.R.).
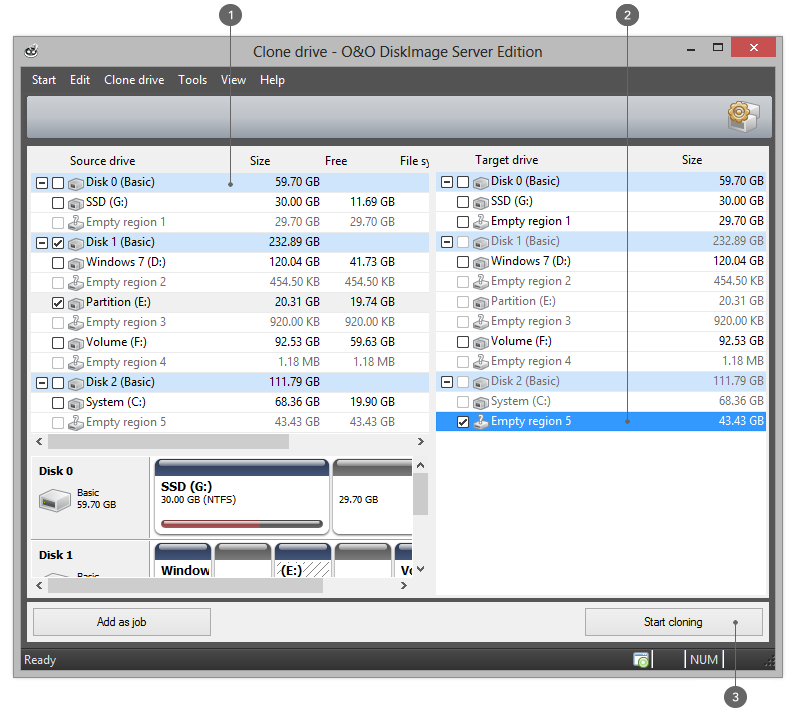
Clone drives
1 - Select Clone driving
2 - Select drive
3- Start cloning